Vinyl Letter Signs

You will need:
Vinyl lettering
Card board
Painters tape
X-Acto knife and/or scissors
a safe surface on which to cut your cardboard
background paint
wax paper or plastic spacing sheets
The main issue with the vinyl letters is that you really should know what you want your signs to say before you go get the lettering. Write out everything you want your signs to say and then make a list of how many of each letter you need. The reason for this is the number of letters you get. Somewhere on the package it tells you how many of each letter is in there you need a list to compare that to the package to make sure you get enough letters.
Just so you have a reference, I used an indoor latex semi-gloss paint in white (American Tradition in Anthem White, if you want to be really specific. It was leftover from painting the trim in my house.) and the letters are 1 inch Helvetica.
This version is easier in some respects than the Stencil Sign and harder in others. You save a whole bunch of time by not having to cut out a ton of letters but that comes at a higher price tag. Vinyl letters cost more than a bit of paint and poster board. How much more depends on where you get your letters, how big they are, and what font you want them in. I honestly don't think I would have gone this route at all had it not been for a number of lettering sheets in the stencil box but I'm glad the letters were found. I really like how the signs turn out but it made me wish that the budget was a little bigger so I could do more with store bought letters.
After you have all your materials together, you need to lay out the lettering. I was lucky enough to have spacing/letter transfer sheets that I could use, but if you don't have those you can use wax paper with a sheet of graph paper underneath it. Take your time and get the letters evenly laid out. It helps with the next step. If you're making a bunch of signs you can put more than one set of lettering on a sheet. You'll have to adjust the lettering a bit when you go to stick the letters on the signs but it saves time to do as much of your lettering layout at one time as you can. It also helps make sure you don't unexpectedly run out of a letter before you've committed yourself.
Once you have your lettering roughed out, take a look at your cardboard and see what size you need for the sign to look good. Cut your card board to size and give it at least 2 coats of paint with your background color. As soon as the paint is dry you can start the next step.
 |
| Roughed out signs on a spacing sheet. The white behind it is the card board base for the sign. Note the second sign's lettering underneath. It isn't properly spaced yet but setting the letters out early makes sure that you have enough letters. |
 |
| Top line spacing tape |
 |
| Bottom line spacing tape |

If you have multiple words on a line it might be helpful for your spacing if you start on the last letter and build the word in backward. That's another reason the lettering sheets come in handy; you don't have to try to spell things backward, you can just peel the letters off in that order.

Go one line at a time, filling in your words both forwards and backwards as needed for spacing.

When you're happy with what you have, it's time for the moment of truth. Time to peel up the tape lines!

Now you do any extra trimming on the card board to make your sign look nicely finished. You can see the bottom edge on my sign is uneven and looks funny, so I trimmed it. Using a stiff bit of cardstock as a guide, I lined it up with one of the corrugations on the card board to make sure the line I was about to cut was as close to perfectly straight as possible. Then you score a line along the edge of your guide with an x-acto knife and use that to help you cut through the card board all the way. You want the sharpest tool you can get for this part. You can use scissors but they compress when they cut and it won't give you the best edge.


And voila! A surprisingly professional looking sign.

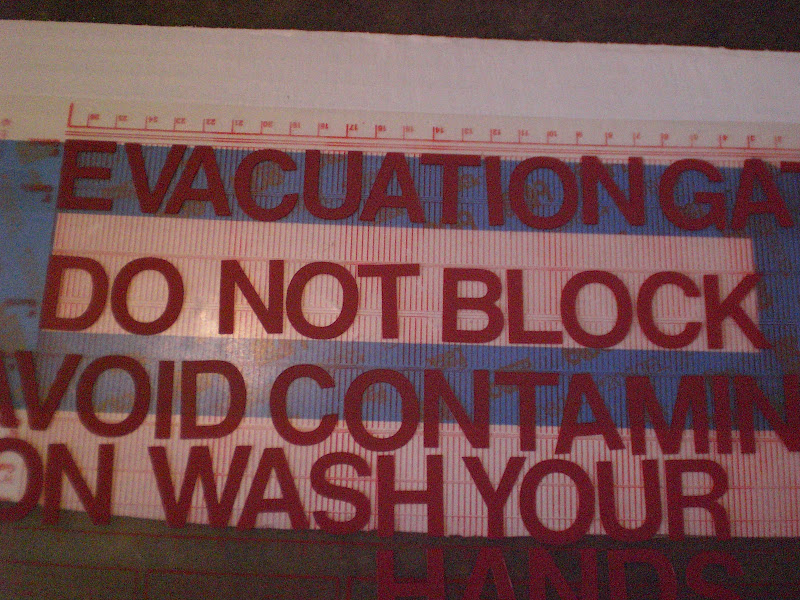
The decontamination signs are for my entry and hall bath door, so they're actually going to be on an interaction level with my guests. That's how I've been deciding which signs get the fancy letters. If the sign is going to be seen mostly in passing, like the one for the porch, it doesn't need to be absolutely pristine and so stencils work great. If the sign is going to be in a high traffic area, like the wash your hands sign and the evacuation gate, having them be a little nicer makes good logical sense. The decon signs are also good examples for why I don't use vinyl letters for everything. The 1" Helvetica letters I used on the round sign came with 3 N's. Decontamination has 3 N's in it. The number of lab related signs you can make without N's is vanishingly small. Think about it; "caution", "warning", "danger", "radiation", "emergency", and anything with "no" or "not" are out of the question when you're out of N's. I can still do "biohazard" and "high voltage" but I'm going to be really limited in what I can do without buying more letters. This is why planning out your wording beforehand is so crucial.
No comments:
Post a Comment